Many of us visits few particular sites many times a day. When you login to your system and open the browser, the first sites most of us hit is google.com right. Then there are few specific sites user want them to be available in their different tabs. We close the browser many times & open it and do the same thing again and again.
It becomes a pause in our flow to do the same thing repeatedly and more frustrating sometimes when the sites require your credentials to login. If your hangs while opening it turns out more ugly.

Here, in this article we will discuss how to automate it, so that with just a single click you get your browser opened with all the required webpages auto login.

Our aim here is to script which opens your browser then open the websites in different tabs for you.

Lets consider an example where we
want to open these sites.

1) http://www.timesofindia.indiatimes.com
2) www.weebly.com

Step 1. Create a batch script to open Browser with specified webpage.

Well that's pretty simple. we just have to write the command like this start firefox.exe google.com
this will open your firefox browser and open google.com as your first tab.

We will do this step in the end, I will explain you why.

Step 2. Make Websites to login automatically.

If you are familiar with web-pages you would be knowing that how posting data in web page works. If you are not aware no need to worry as we don't require in-depth details of it.
A web-page (.html or .htm) has a form element, this form element captures your details like username & password and the form has action attribute which defines to which location the form should be sent when user hits submit.
Examples of form is below

<form action="http://mywebsite.com/login" method="post">
  Username: <input name="user"><br>
  Password: <input name="pwd"><br>
  <input value="Submit">
</form>

<form action="login.jsp" method="post">
  Username: <input name="user"><br>
  Password: <input name="pwd"><br>
  <input value="Submit">
</form>

Note the difference between two forms. In the first form the action is complete url while in second it is not. In second it is a relative url. For our processing, we will be needing the complete url, if the webpage uses relative form action path you can make it complete url like this

if your login page address is
http://mywebsite.com and form action is given as login.jsp
then complete url would be
http://mywebsite.com/login.jsp

Now as you can understand the main part we are concerned about is form element of webpage.

To auto login we can achieve this via two ways.

a. Save the login page and edit the value of username and password in the respective form elements.

b.
Create a new web page and copy the form elements in to it.

We will take both the approach one by one.

Consider the first case
where we will save the page and edit it according to our needs.

www.weebly.com this is the page we want it to login automatically.


Do the following steps.

a.1 Open Browser and hit the url www.weebly.com, once the page is loaded save the page (Ctrl + s)

a.2 Open the saved htm file in notepad or notepad++
a.3 Place the mouse at the top row and search for "Email Or Username" as displayed in the webpage.
a.4 When you find the matching text, try to find the form element containing this.

Snapshots available below are not in proper sequence. Sorry for being lazy :-)
a.5 If we look the action url of the form it is a complete url. So we don't need to modify it.
a.6 Now we have to hardcode the Username & Password in the form. for this we need to add the value tag with       the corresponding value of Username & Password.
a.7 We will name our form as something so that we can submit it by name. use name="auto_submit_form"
a.8 To auto submit the form we need to write a small script.
      <script type="text/javascript">
        document.forms["auto_submit_form"].submit();
    </script>

This Script must be added just before the body closing tag. </body>

Now after doing all this modifications, save your html file and open in the browser. it should logged in automatically if everything was done as told.

Now we will look on another way of achieving this.

As we progressed, we saw that the only thing that matters are form data. so if we can keep that form data and remove everything it will look simple enough to grasp.

Look at this HTML file..


<html>
    <body>
        <form name="auto_submit_form" id="weebly-login" method="post"
                        action="https://www.weebly.com/weebly/login.php">
            <input  id="weebly-username"  name="user" value="[email protected]"
                    placeholder="Email or Username" ><br>

            <input id="weebly-password"  name="pass" value="myPassword" placeholder="Password" ><br>
            <input name="force-submit" id="force-submit" value="0" >
</form>

    <script >
        document.forms["auto_submit_form"].submit();
    </script>   

</body>
</html>


It conveys the same thing as of that webpage we downloaded. Except there is no fancy UI available. But we don't want it too as our aim is to go to Home page directly, crossing the login page.
If you save the above code as filename.htm and run it in browser it will result in the same thing.


We have achieved the login functionality as of now. Now we just have to connect everything together.

Save the modified page either by approach a or b and place it in a directory.
Lets assume the directory is C:\Documents and Settings\user1\Desktop\blogs_stuff and filename is weebly.htm


Now open a
blank file paste the below code and save it as .bat file.

start firefox.exe "
C:\Documents and Settings\user1\Desktop\blogs_stuff\weebly.htm"
ping -w 2000 0.0.0.0
start firefox.exe "timesofindia.com"


The code looks pretty simple we command to open firefox with the mentioned URL.

What's the use of
ping -w 2000 0.0.0.0
It commands to ping to ip address 0.0.0.0 with timeout as 2000 milli seconds. As ip 0.0.0.0 is invalid we are expecting a timeout to happen that can give us a break of 2 sec.

This line helps us to give a pause for 2 sec before opening
timesofindia.com, If we don't do so, The execution will happen so fast that it will end up opening two browser windows.

Note: This is tested just for firefox, running in iexplorer may behave weirdly & you will be required to do some tweaks.


That's it, we are done with our work. But remember that this has major security breech, Your password is available in a file and anyone can read it & misuse it. So be careful while doing it. :-)

Let me know if you have any doubts. Have a nice day :-)

*****************************************************************************************************************************************
 
In this Example we are going to develop a SCA application that gets the input as a location of a pdf file. read the PDF and returns the byte array. This application will be exposed via HTTP Binding so that it can be integrated with a web application.

Prerequisites
  1. Basic understanding of a web application (jsp, HTML form).
  2. Familiar with using IBM Integration Designer.
  3. Basic understanding of SCA applications (Creating Different components like Import, Export, Java Component)


Steps to Create a Working SCA HTTP Module
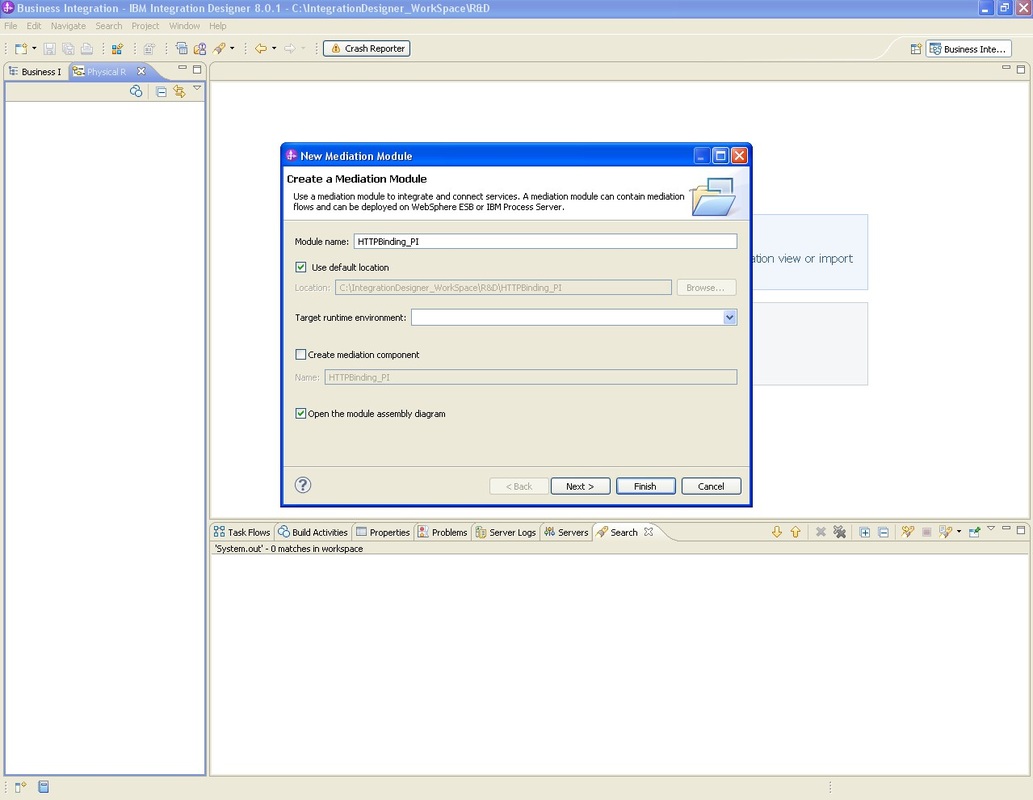
  1. Open the Integration designer and click on New-> mediation Module, a pop will appear asking to give the details of name of module.

2. Create two Business Object for our interface. Request Object and Response object. request Object will contain a string variable for storing the location of file. response Object will have a pdfBytes variable of base64binary type to store the read file bytes.

To create Business object, Right Click -> New -> Business Object
3. Create an Interface right Click -> New -> Interface.
     Create an operation in the interface getFile and add the Request & Response Object created earlier to its input &      output.
4. Create a Java component and attach the Interface to that component. create an export and link it to the Java Component. generate the Binding for for Export component (Http Binding) and Implement the java component.
At this point we have build the basic structure of our Module. from Now on we will proceed Step By Step with explanation as to why that step is required.

The first thing that need to be done is Converting HTTP Post data in to Request Business Object. For that We need either a datahandler or databinding. we will make use of both these two illustrate their functions.

We will create a data handler that will process the incoming request. i.e it will convert HTTP Post data in to Input Business Object.
A data binding will also be created to process the outgoing response. i.e converting response object in to HTTP native data.

5. Create a data handler
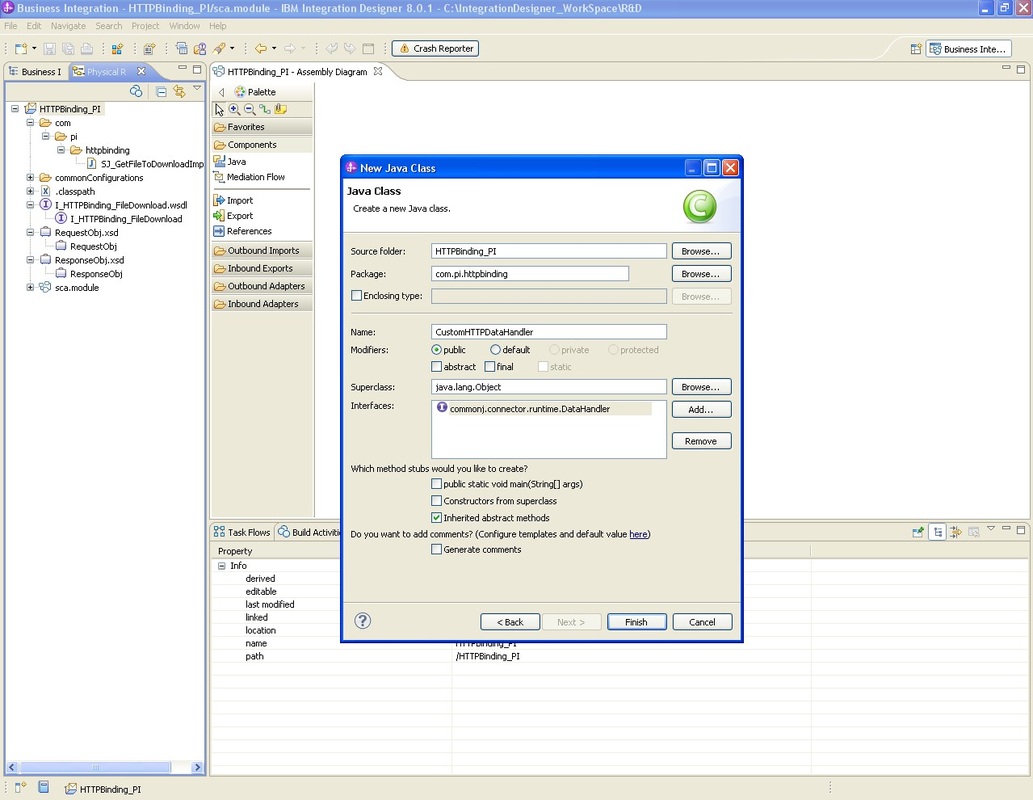
To create a data handler yo need to create a class that implements DataHandler Interface.
    commonj.connector.runtime.DataHandler
After doing that we need to Implement the 3 Abstract method of DataHandler Interface.

a. transform() - used to convert the Native data of protocol to DataObject for Incoming Request.
b. transformInto
() - used to convert the DataObject in to Native Data for outgoing response.
c. setBindingContext() - To bind the context.

We are more concerned about transform method because we are using this datahandler for incoming request , for outgoing response we are going to create a different databinding.

transform(Object source, Class arg1, Object agr2) method has three parameters
.

basically we have to convert the source in to Our Request DataObject
.

Source in this case will be InputStream (as it is HTTP Call we are processing.)

Input Stream contains all the parameters in HTTP Form body.

Lets create a class CustomHTTPDataHandler and implements DataHandler interface in it.

************************************************************************************************************************************************   
package com.pi.httpbinding;
import java.io.IOException;
import commonj.sdo.DataObject;
import com.ibm.websphere.sca.ServiceManager;
import java.util.Map;
import java.io.InputStream;
import commonj.connector.runtime.DataHandler;
import commonj.connector.runtime.DataHandlerException;

public class CustomHTTPDataHandler implements DataHandler {

private static final long serialVersionUID = 1L;

public Object transform(Object source, Class arg1, Object arg2)
    throws DataHandlerException {

            int bufferSize = 2000 * 4;
            String inputStr = null;
            if (source instanceof InputStream) {
            InputStream is = (InputStream)source;
            try {
                is =(InputStream)source;
                byte[] inputs = new byte[is.available()];
                is.read(inputs);
                inputStr = new String(inputs);
                System.out.println("InputStream-"+inputStr);
                is.reset();
                String[] param=inputStr.split("&");
                for(int i=0;i<param.length;i++)
                    {
                    String decoded = java.net.URLDecoder.decode(param[i], "UTF-8");
                    if(decoded.startsWith("pdf="))
                        {
                        String path =decoded.substring(4);
                        com.ibm.websphere.bo.BOFactory boFactory =            (com.ibm.websphere.bo.BOFactory)                                                       ServiceManager.INSTANCE.locateService("com/ibm/websphere/bo/BOFactory");
                         DataObject BO = boFactory.create("http://HTTPBinding_PI", "RequestObj");
                         BO.setString("pdfLocation",path);
                        return (Object)BO;
                    }  
                }
            } catch (IOException e) {
        e.printStackTrace();
       
    }
   
}

else{
        throw (new DataHandlerException("Input must be of InputStream type"));
    }
return null;
}


    public void setBindingContext(Map context) {
           
    }


public void transformInto(Object source, Object target, Object options)
            throws DataHandlerException{

//Not Implemented because we will Implement the Data Binding to process the response.

}


}

************************************************************************************************************************************************

Now with this class your Input data from HTML form will be converted in to RequestObj & will be passed on to SJ_GetFileToDownload in form of Business Object. Ofcourse you need to configure this class to the export component to make it work, that we will do a little later.

6. Implement the getFile function.


Now we will Implement the operation getFile in Sj_GetFileToDownloadImpl class.

************************************************************************************************************************************************
public DataObject getFile(DataObject input1) {
        try {
            com.ibm.websphere.bo.BOFactory boFactory = (com.ibm.websphere.bo.BOFactory)                    ServiceManager.INSTANCE.locateService("com/ibm/websphere/bo/BOFactory");
            DataObject response = boFactory.create("http://HTTPBinding_PI",
                    "ResponseObj");
            String location = input1.getString("pdfLocation");
            System.out.println(location);
            byte[] pdfBytes = null;
            URL u = new URL(location);
            URLConnection uc = u.openConnection();

            String contentType = uc.getContentType();
            int contentLength = uc.getContentLength();
            if (contentType.startsWith("text/") || contentLength == -1) {
                throw new IOException("This is not a binary file.");
            }
            InputStream raw = uc.getInputStream();
            InputStream in = new BufferedInputStream(raw);
            pdfBytes = new byte[contentLength];
            int bytesRead = 0;
            int offset = 0;
            while (offset < contentLength) {
                bytesRead = in.read(pdfBytes, offset, pdfBytes.length - offset);
                if (bytesRead == -1)
                    break;
                offset += bytesRead;
            }
            in.close();
            raw.close();
            if (offset != contentLength) {
                throw new IOException("Only read " + offset
                        + " bytes; Expected " + contentLength + " bytes");
            }
            response.setBytes("pdfBytes", pdfBytes);
            return response;

        } catch (Exception e) {
            e.printStackTrace();
        }

        System.out.println("Returned");
        return null;
    }

************************************************************************************************************************************************
At this stage we have developed our data handler for input processing & implemented the java component function that will read a pdf file from a location and convert it in to bytes array and set in the ResponseObj and return it back to Export component.


7. Create a Data Binding for converting the response stored in Business Object in to HTTPOutput Straem to process by Browser.


Create a class CustomHTTPDataBinding that implements
HTTPStreamDataBinding Interface.


The data binding should have four private properties:
  • private DataObject pDataObject
  • private HTTPControl pCtrl
  • private HTTPHeaders pHeaders
  • private yourNativeDataType nativeData


The HTTP binding will invoke the customized data binding in the following order:
  • Outbound processing (DataObject to Native format):
    1. setDataObject(...)
    2. setHeaders(...)
    3. setControlParameters(...)
    4. setBusinessException(...)
    5. convertToNativeData()
    6. getControlParameters()
    7. getHeaders()
    8. write(...)
  • Inbound processing (Native format to DataObject):
    1. setControlParameters(...)
    2. setHeaders(...)
    3. convertFromNativeData(...)
    4. isBusinessException()
    5. getDataObject()
    6. getControlParameters()
    7. getHeaders()
As we have already dealt the Inbound processing via our DataHandler, We will concentrate on implementing the methods for Outbound Processing.

lets have a look on these function and their purpose.


setDataObject(..) - This will set the data object response from java component (SJ_GetFileToDownload)

setHeaders(...) - Will set the Headers for HTTP call.

setControlParameters(...)  - Will set the control parameters for HTTP Protocol.

setBusinessException(...) - Set Exception if happend during processing. Not required for our case.

convertToNativeData()  - it converts the DataObject in to the Native Data by calling specialised function realConvertWorkFromSDOToNativeData()

getControlParameters() - get the control parameters set before writing in the output stream

getHeaders() - get the set headers before writing in the output stream

write(...)  write the byte content in to stream.


************************************************************************************************************************************************

package com.pi.httpbinding;

import java.io.IOException;
import java.util.Arrays;
import com.ibm.websphere.http.data.bindings.HTTPStreamDataBinding;
import com.ibm.websphere.http.data.streams.HTTPInputStream;
import com.ibm.websphere.http.data.streams.HTTPOutputStream;
import com.ibm.websphere.http.headers.HTTPControl;
import com.ibm.websphere.http.headers.HTTPHeaders;
import com.ibm.websphere.http.headers.HTTPHeader;
import com.ibm.websphere.http.headers.HeadersFactory;
import commonj.connector.runtime.DataBindingException;
import commonj.sdo.DataObject;

public class CustomHTTPDataBinding implements HTTPStreamDataBinding {

    /**
     *
     */
    private static final long serialVersionUID = 1L;

    DataObject pDataObject;
    HTTPControl pCtrl;
    HTTPHeaders pHeaders;
    byte[] nativeData;

        public void setDataObject(DataObject dataObject)
                throws DataBindingException {
            System.out.println("Call Set DataObject");
            pDataObject = dataObject;

        }

        public void setControlParameters(HTTPControl arg0) {
            System.out.println("Call Set Control Parameters");
            this.pCtrl = arg0;
        }

        public void setHeaders(HTTPHeaders arg0) {
            System.out.println("Call Set Headers");
            this.pHeaders = arg0;
        }

        /*
         * Add http header "IsBusinessException" in pHeaders. Two steps: 1.Remove
         * all the header with name IsBusinessException (case-insensitive) first.
         * This is to make sure only one header is present. 2.Add the new header
         * "IsBusinessException"
         */
        public void setBusinessException(boolean isBusinessException) {
            System.out.println("Call Set Business Exception");
            }

        public HTTPControl getControlParameters() {
            System.out.println("Call get CP");
            return pCtrl;
        }

        public HTTPHeaders getHeaders() {
            System.out.println("Call get headers");
            return pHeaders;
        }

        public DataObject getDataObject() throws DataBindingException {
            System.out.println("Call get DataObject");
            return pDataObject;
        }

        /*
         * Get header "IsBusinessException" from pHeaders, return its boolean value
         */
        public boolean isBusinessException() {
            System.out.println("Is Busn Excep");
            String headerValue = "false";//getHeaderValue(pHeaders, "IsBusinessException");
            boolean result = Boolean.parseBoolean(headerValue);
            return result;
        }

        public void convertToNativeData() throws DataBindingException {
            System.out.println("Call To Native Data");
            DataObject dataObject = getDataObject();
            this.nativeData = realConvertWorkFromSDOToNativeData(dataObject);
        }

        public void convertFromNativeData(HTTPInputStream arg0) {
            // Customer-developed method to
            // Read data from HTTPInputStream
            // Convert it to DataObject
            System.out.println("Call To BO Convert");
            DataObject dataobject = realConvertWorkFromNativeDataToSDO(arg0);
            try{
                setDataObject(dataobject);
            }catch(Exception e){
                e.printStackTrace();
            }
            
        }

    public void write(HTTPOutputStream output) throws IOException {
        System.out.println("Call Write");
        if (nativeData != null) {

            output.write(nativeData);

        }

    }
        public byte[] realConvertWorkFromSDOToNativeData(DataObject dataObject)
        {
            System.out.println("Call realConvertWorkFromSDOToNativeData");
            byte[] byteArray=null;
            byteArray=dataObject.getBytes("pdfBytes");//getPDFBytes();
                  //target =baos;
            
            return byteArray;
        }
        public DataObject realConvertWorkFromNativeDataToSDO(HTTPInputStream arg0)
        {
            System.out.println("Call realConvertWorkFromNativeDataToSDO");
            
            return null;
        }
        

}

************************************************************************************************************************************************


Now we have all the code ready for our SCA Application.

We just need to link all these components to make it work properly.


8. Configure the HTTP Export Component.


Click the export Component EXP_GetFileToDownload. and go to the properties tab of it.

select Binding tab in it.

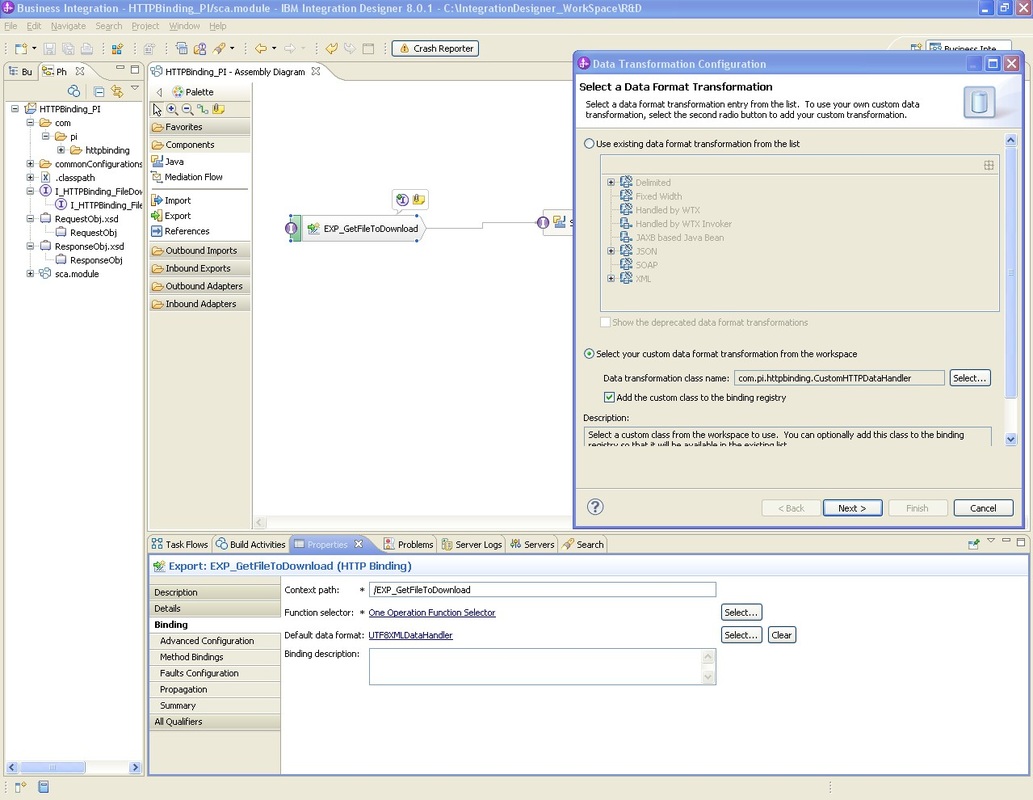
Select Default Data format.(default It will be UTF8XMLDataHandler) Select your custom data handler developed and add it in registry.

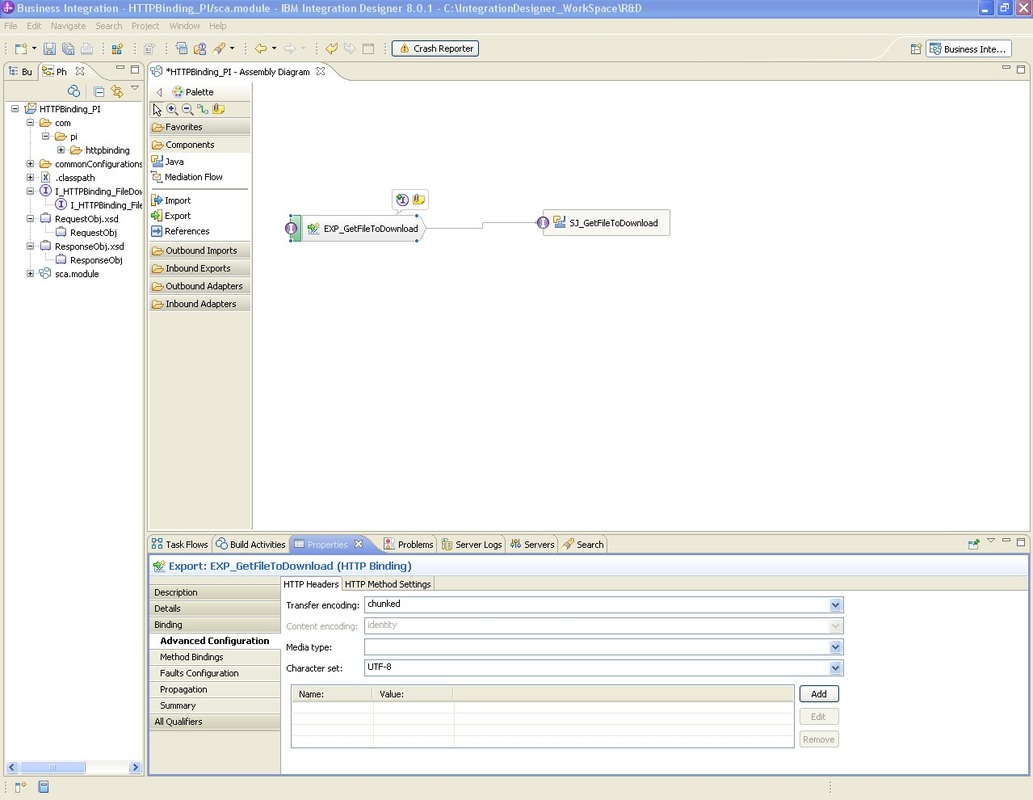
Go To Advanced Configurations and in HTTP Header tab select the Transfer Encoding from identity to Chunked(as we are sending bytes for file to be downloaded)
Go to HTTP Method tab and change the method type from GET to POST.

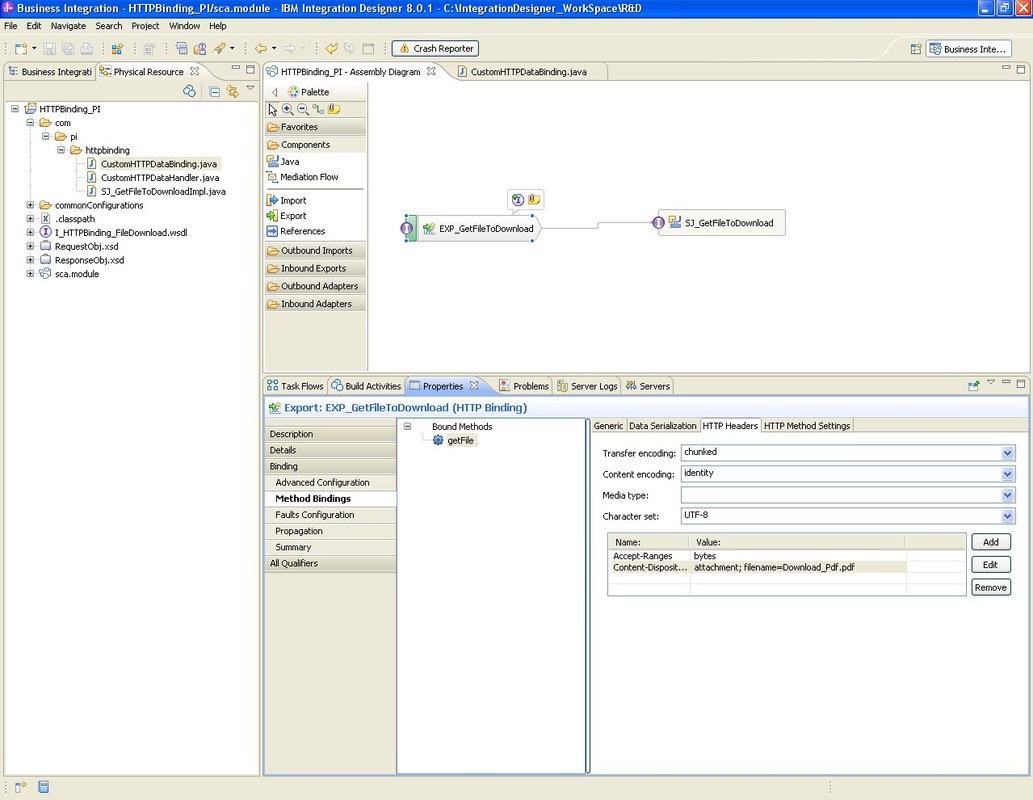
Go To Method Binding Tab -> Data Serialization and select Input Data Format to CustomHTTPDataHandler & Output Data format as CustomHTTPDataBinding class that we have developed.

In
Method Binding Tab go to HTTPHeaders and change the Transfer Encoding to Chunked.
In HTTP Method tabs Change the method from GET to POST.

In Method Binding Tab go to HTTP Headers and add the following header
Accept-Ranges bytes
Content-Disposition attachment; filename=Download_Pdf.pdf

Refer the figure below.
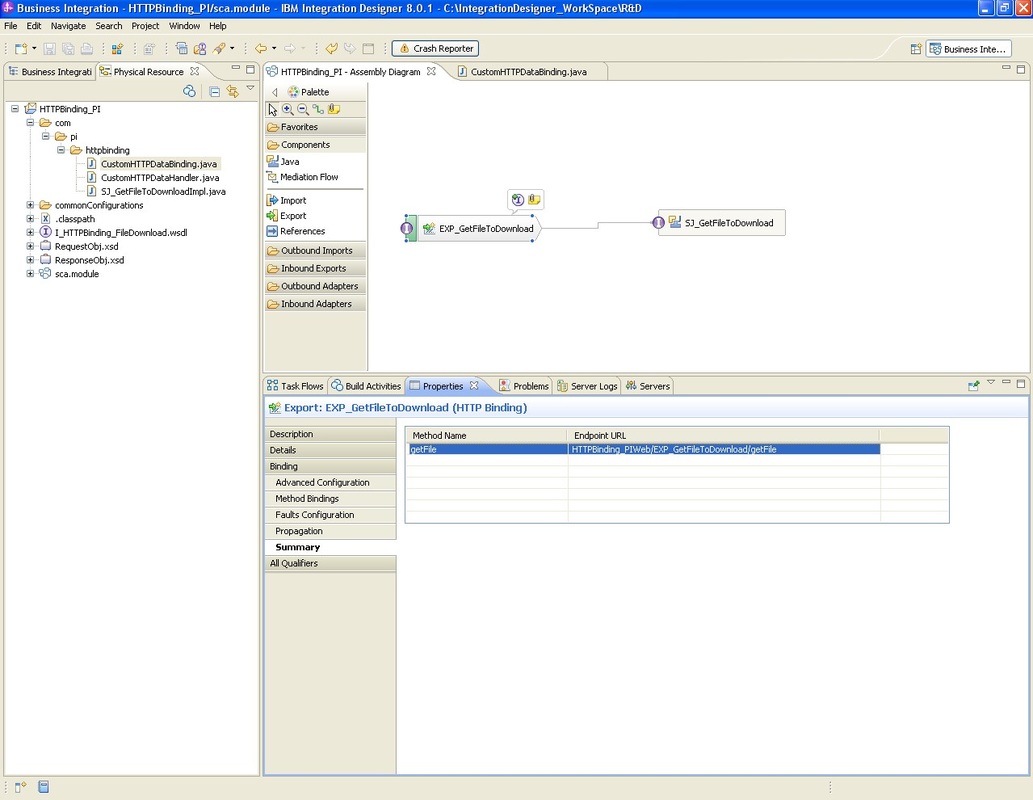
Go to summary tab and make a note of Endpoint URL. this is the URL we will call from a consumer to use this service

EndPoint URL - HTTPBinding_PIWeb/EXP_GetFileToDownload/getFile

Save the Project, Clean it and build it.We are done with all the required components and their configuration for our Service provider Module.To test it we need a service Consumer.
In this case our service consumer will be a simple web application having only one jsp which will call this HTTP SCA Application.


8. Creating a simple web application to call the HTTP SCA Application.

a. Right click on the project explore view. click New -> Project

Search for Dynamic Web Project.

Create a Dynamic Web Project and gie the Project name (HTTP_WebApp_Consumer)

b. Right click on Web Content folder and Click New- > Jsp File

Create a Jsp page with some name (index.jsp)


C. Create a form in the body of JSP page.


d. Add the form inside the body.

Your jsp page will look like this

index.jsp

**********************************************************************************************************************************
<%@ page language="java" content
    pageEncoding="ISO-8859-1"%>
<!DOCTYPE html PUBLIC "-//W3C//DTD HTML 4.01 Transitional//EN" "http://www.w3.org/TR/html4/loose.dtd">
<html>
<head>
<meta http-equiv="Content-Type" content="text/html; charset=ISO-8859-1">
<title>Insert title here</title>
</head>
<body>
Sample Web App for Calling SCA Application Exposed via HTTP Binding
<form action="http://localhost:9080/HTTPBinding_PIWeb/EXP_GetFileToDownload/getFile" method="post">
<input name="pdf" value="file://///xx.xx.xx.xx/myfolder/abc.pdf"/>
<input name="Submit" value="submit">
</form>
</body>
</html>


*********************************************************************************************************************************
The red colored portion
is the path of your pdf file. where xx.xx.xx.xx denotes the machine ip. replace the path according to your pdf location.


Now we are ready to test our modules developed.

deploy both the SCA app as well as Web application in your Process Server.

Run the index.jsp and click the submit button in it.

You should be Getting a pdf to download if everything is working as expected. :)

Let me know in case you have a question.


Have a good day :-)


As you know, HTTP is widely used protocol especially used in the communication across web application.J2EE and web application rely heavily on HTTP protocol for their processing. So Integrating the HTTP protocol with SOA based application can be very useful for Enterprise Applications Processing.

Scenarios Of HTTP Binding

1) SCA Applications communicating with other Web Applications via HTTP Import.
2) SCA Applications can Expose themselves as HTTP applications and can be used by other HTTP Consumers.
3) Process Server and ESB can communicate over HTTP Infrastructure.

In a SCA based applications all the processing happens in form of Interface and Business Objects.
Data is passed to different component in form of BO via a Interface call.
Whereas in HTTP Protocol the communication in the form of different method calls like SERVICE,GET,POST
,DELETE,PUT etc.

Because of the different nature of both protocols, the data from one has to be converted in to other and vice versa.

For ex.
Consider an SCA Application that takes input in a BO and returns the processed output in form of BO.
To call this application over HTTP, the post data of form (or get data) must be converted to DataObject for SCA application to process it. Similarly the output of SCA app (i.e DataObject)
must be converted back to native format (HTTP Stream) for the caller (eg. web app) to make use of it.

To achieve this functionality DataHandler & Data Binding comes in to picture. The job of DataHandler & Data Binding is to convert the data from one format to other format. DataHandler & DataBinding achieves the same functionality but there is slight difference between these two.
Datahandlers provide a binding neutral interface and can be associated with any transport bindings while the DataBindings are specific to particular transport bindings. i.e. A DataHandler can be attached to any Export or Import component Having any type of transport Binding (e.g SCA WebService, HTTP) while DataBindings is developed for a specific transport binding (E.g. DataBinding developed for HTTP can be used for Export Import Component having HTTP binding.)

There are various DataHandler and DataBindings are provided by IBM for handling the most of scenarios. If the requirements of an application does not comes under the pre-packaged bindings, we can develop it on our own and can make use of it.

List of Pre Packaged HTTP Binding

http://publib.boulder.ibm.com/infocenter/dmndhelp/v6r2mx/index.jsp?topic=/com.ibm.wbit.620.help.http.doc/topics/chttpconfig.html

Let's take an example of a sca Application exposed as HTTP Binding & Consumed by a web application using post method.
1) In this example we will create a simple web application (used as service consumer) to call the sca application via submitting a form in a jsp.
2) The sca application will be exposed with HTTP Binding and act as Service provider. When it receives a call from web app with html form data (sent via post method), it will convert the post data in to Business Object because SCA app processing happens in form of Business Objects passed to different component.
3) After processing the response the output stored in response Business Object will be converted back again to native format (i.e. HTTP format for web app to process the received output.)

In the Example discussed We will create a web application that will post the data containing location of PDF file.
The SCA application will get the location and read the PDF & convert it in to byte array and send it back to the caller.